Kindle | Nook | iBooks | Kobo | Smashwords
In this chapter, we’ll break down your site’s content into its atomic parts. Most of us have situations where the big blob of rich text that constitutes a blog post is not the best way to manage our content. We’ll break that up into modular fields and reusable pieces that will allow us to do a better job of managing the content and displaying it in a variety of contexts. This is the process of content modeling.
In her article for A List Apart, Rachel Lovinger breaks down the elements of content modeling:
A content model documents all the different types of content you will have for a given project. It contains detailed definitions of each content type’s elements and their relationships to each other.
Lovinger mentions that every CMS has a basic philosophy on storing content. In WordPress, the basic building block of content is a post. Even pages are just posts with some different attributes (template, parent, order) that are usually presented individually instead of in chronological lists.
WordPress lets us play around with these building blocks. We can create additional post types and choose whether they should behave like posts or pages. We can create new taxonomies (ways of grouping posts) and add new post fields (new attributes).
Let’s start with the smallest things we can add to a post: custom fields.
Custom fields
A custom field is just an attribute, a new facet of an existing post. It’s one new thing about the content, not the whole of the content. If you’re blogging about product sales, for instance, the price of today’s discounted item might go into a separate field. Breaking this information out of the body of the post (in this case, the description of the product) into a distinct field offers a couple of benefits. For starters, it lets you display the information in a consistent format without the post author having to remember style guide rules (“the price is always shown between the title and description, in bold, with a dollar sign and two decimal points”). The author just enters the information into its own field; the template and stylesheet do the work of presenting it consistently across all the posts. Using a separate field also lets you sort these posts by price—something you can’t do easily if the price is just the second bold paragraph in a big blob of text. I’ll talk more about this later in this chapter under “Functional and Organizational Requirements.”
Look through your posts. Do any of them share a consistent format? Have your content authors ever asked you to prepopulate the post editor with a starter template? Consider whether the goal might be accomplished by breaking up the content into several distinct fields.
What might those fields be? Almost anything: a simple text input, a second rich-text editor like the main post body, a numerical or monetary input, a date/time picker, a color picker, a file upload … any part of your post that has a specific format and is used frequently, if not always.
This is sometimes called structured blogging, and there are lots of plugins to add common structures to your site:
- Books
- Classes
- Employees
- Events
- FAQs
- Podcasts
- Portfolio projects
- Recipes
- Reviews
If your content doesn’t fit neatly into one of the common structures, you’ll need to build the structure yourself using custom fields.
Taxonomies
Next, let’s talk about grouping posts. WordPress comes with categories and tags, but it’s easy to add more taxonomies. A taxonomy is simply a new set of categories or tags—a way of classifying things.
Take a look at the things you’ve marked to become separate fields. Are any of them lists of things, where it’d be nice for the user to be able to check a box from a list of presets? Is that list something that’s common to all the posts? A taxonomy might make sense in this situation. Furthermore, look closely at your existing categories and tags. Do you have several kinds of things lumped together in one big pool?
I’ll use the example of a research institute throughout this book. This site describes research projects on various species, and has profiles of the people doing the research. On the current, badly structured site, the lists of categories and tags go like this:
Categories: Simkins Geneva Colebrook, microbiology
Tags: halobacteria, H. salinarum, Halobacterium salinarum
Here we have two taxonomies, but three different ways of classifying this project: the researcher’s name (mangled to preserve alphabetical listings), the general field of science, and the species involved. When you look through this site’s category list, you get a bewildering soup of people, species, and areas of science. If you’re looking for the species alone, you’d have to comb through all the researchers’ names that fall alphabetically before “Halobacterium”!
What this site should do is separate these things into custom taxonomies. If we use the main categories to describe the kinds of blog posts this site contains (e.g., research projects, administrivia, news and events), we can separate the rest into three custom taxonomies: Researchers, Fields, and Species. It might look something like this:
Researcher: Simkins Geneva Colebrook
Categories: research projects
Field: microbiology
Species: Halobacterium salinarum
We’re still mangling the author’s name (I’ll talk more about this in a moment), but otherwise, this is a much more readable list. Plus, our archive pages will now make a lot more sense! The Researchers archive page will list all the people whose projects have been mentioned, without clutter from species and administrative categories.
We could perhaps simplify this if the site doesn’t do a lot of posts other than the research project descriptions, and just use the main categories for the fields. When deciding how to apply taxonomies, it helps to look at not only what kinds of posts you write, but how many of each you have. If this site has only two administrative posts in four years’ worth of archives, but there’s a new project every couple of weeks, we can probably use categories for fields. If, however, it’s a busy site with not just project descriptions but also guest blog posts from other scientists, weekly events, and press releases, then we need to use categories to describe each of these things, and we should give the scientific field its own taxonomy.
In the next chapter, I’ll show you how to create custom taxonomies and display them in your posts.
Post types
When extra fields and new ways of grouping posts just aren’t enough to distinguish them, you need whole new content types. A new post type is appropriate when you have two (or more) kinds of content that are utterly different things. The whole of one is different from the whole of the other. On a book review blog, a review isn’t all that different from an administrative blog post. The blog is the purpose of the whole site, and the two kinds of posts can be distinguished using categories. Instead, consider a clothing manufacturer’s website; the product catalog and the company blog are wholly different things. While a blog post and a product page have similar structures—each have title and body fields—they aren’t the same and would never be listed together. On such a website, adding a product post type would make sense. You could then extend the product post type with additional custom fields (price, size, color) and a taxonomy for the type of clothing (shoes, shirts, trousers).
What if one of your classifications needs more information than just a name and description? You don’t have to force it to be a taxonomy; you can create connections between post types using a plugin like Advanced Custom Fields (ACF). This is the kind of decision you’ll make when you analyze your functional and organizational requirements.
Taxonomy or linked post type?
You’ve seen how using people’s names in a taxonomy can cause headaches. There’s a second problem with taxonomies: Each term has only its name and description, in which HTML isn’t allowed. There’s no easy way to add more information to a taxonomy term, like an image—or, in the case of a person’s name, its alphabetical version.
In our research institute example, we can break out of this conundrum by creating a whole new post type for researchers rather than using a taxonomy. The researcher posts will be linked to their project posts. Instead of limiting ourselves to the category description for the person’s bio, we can use the full rich text of the researcher post body. We can also use the featured image to store a photograph, and we can add custom fields to store contact information—which we’ll then use to build the staff directory.
Post relationships are not (yet) among WordPress’s building blocks, but there are several plugins that support it. Advanced Custom Fields is one of my favorites. Creating connections is just as easy as tagging (Fig 2-1).
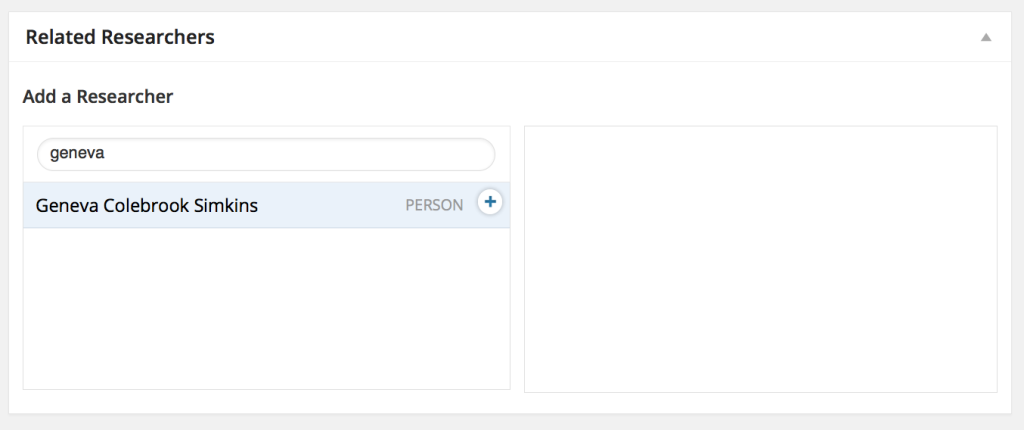
Now we can add Geneva’s name to the project just as we did before—only now the name is written normally, and if a user clicks its link, he’ll be taken to a lovely page full of information about Geneva followed by a listing of all her other projects.
You’ll see more examples of taxonomies and connected post types in Chapter 3, “Content Modeling.”
As you build your content model, examine each taxonomy carefully. Is a term name and description sufficient, or do you need to store more information about each term? If so, consider whether a separate post type, with connections built in Advanced Custom Fields, might be a better choice than a taxonomy.
Drafting missing content
Now that you’ve thought about the possibilities for new post types, taxonomies, fields, and relationships, it’s a good time to go over your content inventory and identify the things that are missing. Maybe you started your project because your organization has a new initiative that didn’t fit into the current site model, or maybe you discovered during the inventory that no one ever created the Locations and Hours page you thought you had.
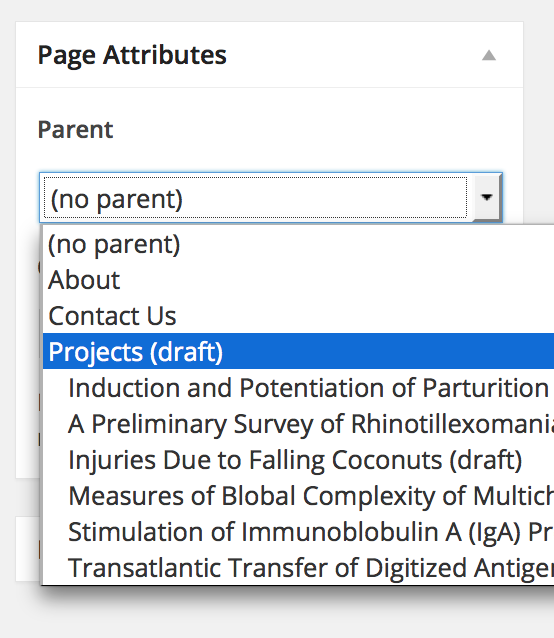
This process is called a gap analysis, and it’s another thing people often do in spreadsheets outside the CMS. I prefer to do it in WordPress by creating draft pages. That way, I can assign them to content owners, mark them as incomplete, and work their creation into the content-editing phase of the project.
However, there’s a bug in WordPress that prevents you from creating hierarchies of unpublished pages. Draft, pending, future, and private pages do not appear in the Parent Page dropdown on the Page Edit screens. You can fix this by installing a small plugin, Unpublished Hierarchies. With this in place, you’ll be able to create hierarchies of draft pages, or schedule a page and all its children to be published on a future date (Fig 2-2).
Functional and organizational requirements
As you decide whether you need to create new post types, you should think ahead to the way your content will be displayed and sorted. Let’s go back to Rachel Lovinger’s A List Apart article on content modeling. She writes:
But determining which pieces of information need to be captured in separate fields can be a challenge in some cases. Consider the following:
Layout Do some things need to be displayed in a completely different style, or on varying places on the page? You should avoid having markup and styling stored with the content, so ideally each element that needs to be displayed differently should be in its own field. For example, you could just make the subtitle part of the body text and ask your editors to bold it, but how well is that going to work with the RSS feed or on a mobile device?
Reuse Again, a separate field of data can be pulled out and used independently of the rest of the page, but not if it’s all part of one big body text.
Sorting and filtering If you want to be able to sort content by date, or filter content that pertains to a particular city, then these pieces of information have to be in a field by themselves so that they can be used to sort and filter.
Consider the clothing manufacturer I described earlier. Once you’ve separated products from blog posts on this site, you can present the product catalog in a much more meaningful way. You could, for example, create a search function specific to the products. You could design different templates to display the individual products, and design photo grid archives for search results and product categories instead of using the usual text-heavy blog archive style.
Sorting and filtering
By default, WordPress sorts all its post types by date, in reverse order (most recent first). This isn’t always appropriate for things other than a blog, and there are a lot of other ways to sort your content. The WP_Query documentation is pretty technical, but it’s the authoritative reference for the various methods of sorting things. Look at the order and orderby documentation in particular.
The WP_Query documentation also describes how to display content. That is, in fact, the entire purpose of the query: to select certain posts from the database. You can select posts by:
- Author. Who wrote it?
- Category, tag, or taxonomy term. How is it grouped?
- Content type. Post, page, or custom post type?
- Date. Including a range of dates.
- Custom field. Find only those posts that have a field, or where the field matches a certain value, or posts that don’t have a custom field.
There are also many ways to sort items:
- Date, the default. You can also sort by the date the post was modified rather than the date it was originally created.
- Title, alphabetically, either A–Z or Z–A
- Custom field, alphabetically or numerically
- ID
- Slug, the part of the URL that’s unique to each post
- Author
- Post type
- Menu order, if you’re working with pages or another post type that supports this field
- Comment count, which is one way of sorting the most popular items on your site
- Random
You can also change the number of items shown per page.
Once you have the list of posts you want and you’ve sorted the list in a way that suits your site, you can choose how to lay them out using the template system.
Layout
In WordPress, each post type can have its own templates for single views and archive lists. For a custom post type called product, you’d create a file called single-product.php for an individual product’s display, and archive-product.php for lists of products.
In situations where several post types might be mixed together, like search results, you might use conditional tags to change the way one of them is displayed. For example, you could do something like this in your theme’s search.php file to make sure prices are always displayed for products:
if ( 'product' == $post->post_type ) {
    echo esc_html( get_post_meta( get_the_ID(), 'product', true ) );
}
I’ll talk more about theming custom post types, taxonomies, and fields in chapter 3, Content Modeling.
Reuse of, and creating connections between, post types
Let’s go back to the research site and the problem of alphabetizing people’s names. What we really need to do is store two versions of the name, the standard one (Geneva Colebrook Simkins) and the alphabetized one (Simkins, Geneva Colebrook). The only extra field available on a category or tag is the description—but we can’t use that to sort. We could perform some acrobatics with the template and use the category title field to store the alphabetical version, which lets us sort by name, and display the description everywhere we want the standard version. But that would be a big pain.
What we need here is a custom field. But in WordPress, taxonomy terms (that is, individual categories and tags) can’t have custom fields the way posts can. It’s possible to add term metadata—the technical name for category/tag custom fields—with a plugin. Since the WordPress database simply doesn’t support the underlying architecture, though, this plugin would be very complex—and might break if a future version of WordPress does implement term metadata in a different way.
Let’s think ahead a little. What will the researcher category archive pages look like? Without any customization, they’d be a list of all that person’s projects, in reverse order by post date, with the researcher’s name at the top. At most, we could add a brief description of the author using the category description field … which doesn’t allow HTML, so it’d be awkward to try to add something like a photograph or a link to another website.
Clearly, it’d be great to have custom fields for more than just the alphabetized name. WordPress doesn’t support term custom fields, but it does support custom fields for posts …
What if, instead of tying ourselves in knots trying to add custom fields to categories, we created a post for each person? A new post type could have custom fields that reviews don’t: alphabetized name, links to the person’s website, Web of Science profile, and/or Twitter profile; a photo; a CV file; and a rich-text biography or description.
Obviously, we’d need a way to connect the researchers to the posts about their projects. Here, we turn to plugins. Both the Posts to Posts plugin and Advanced Custom Fields can create simple connections between posts. It’s easy to get a list of all the posts connected to a researcher, which we can display on the person’s post page. And it’s easy to get the people connected to a project, which we can list alongside the custom taxonomies—making it look like the people are just another set of categories, but actually providing a lot more information than we could with a category alone.
Keeping in mind the limitations on custom fields for taxonomy terms, revisit your taxonomy list and see if any of them would work better as custom post types with connections.
From model to reality
Once you’ve decided between taxonomy terms and custom posts, and listed all the custom fields you’d want for the new post type, your content model should be just about done. That is, it’ll probably change a little as you work on the site, but you probably have a starting point now. If you’re happy with your model, it’s time to actually build all this stuff.
In Chapter 3, I’ll show you the content model for the research institute, starting with the custom post types (and connections between them).
Tip: Using Admin Column View to navigate page-heavy sites
If your site has a lot of pages, you’ve probably found that it takes forever to find anything in WordPress’s edit screens. Even if you increase the number of pages per screen in your screen options, you still end up paging through lots of screens to reach the page you’re looking for.
The Admin Column View plugin (Fig 2-3) makes it easier to navigate deep page hierarchies. Best of all, it works with other hierarchical post types as well, which means you’ll be able to use it with your custom post types as well as your pages.
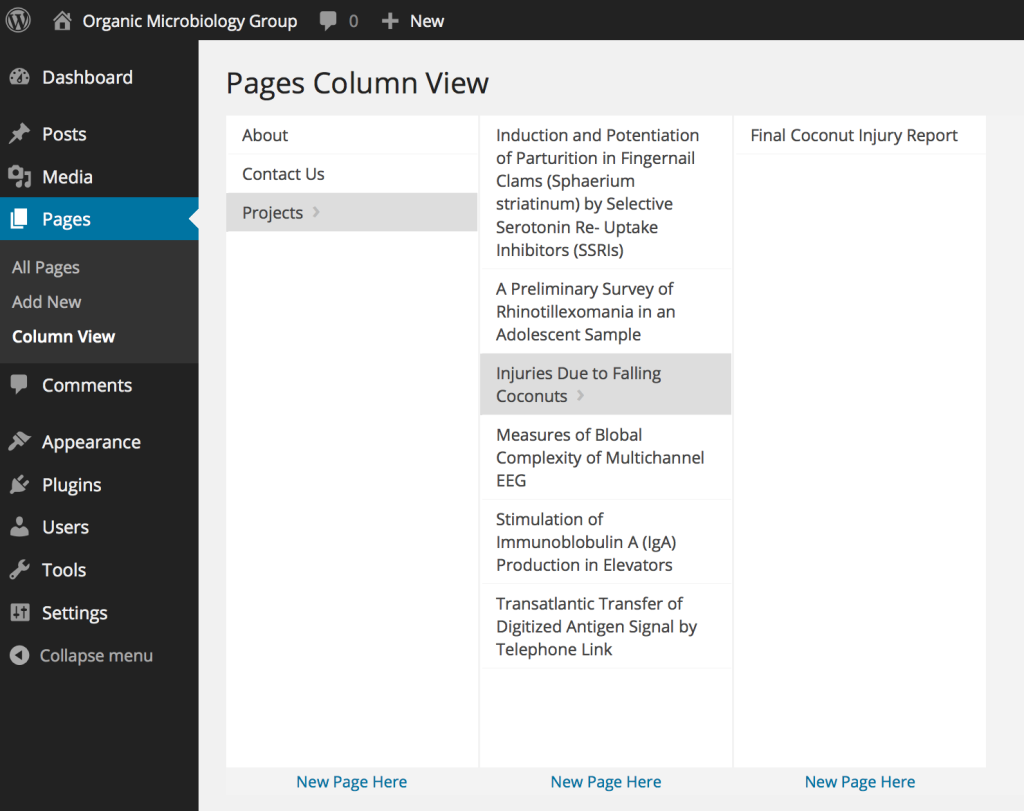
Alas, as of this writing, Admin Column View 1.0.3 conflicts with Advanced Custom Fields, which we’ll be using extensively. With Admin Column View activated, you can’t reach the admin screens for Advanced Custom Fields. With any luck, this conflict will be resolved soon, because they’re both fantastic plugins, and it’s a shame that you can’t use them together on the same site.
Analyzing data
As you looked over your site’s content, you probably started picturing a new content model. Now it’s time to put that down on paper, examine it, and ask your stakeholders about it. If you find problems with the model at this stage, toss it and start over! The whole point is to find a new model that will make your site management easier. Don’t force your content into models that don’t fit; change the model instead.
If you’ve never used custom post types before, you might be unsure if they’re the right choice for your content. User experience designer Chiara Fox Ogan has an excellent list of questions you can use to determine whether your content requires a whole new post type:
- Does it use a specific template?
- Are there lots of items like this, with just differences in subject matter?
- Can it stand alone, without context?
- Is there a specific purpose or use?
- What expectations do people bring to it?
If there’s a part of your site where your answers to these questions differ from standard posts or pages, you need to create a new post type.
Talking about the content model with stakeholders
If you are not the only person who edits the content on your site, getting your other stakeholders’ input on the content model is essential.
Who should you talk to?
- Primary content editors
- Subject matter experts (even if they don’t edit the site directly)
- Anyone in charge of an offbeat or marginalized part of the site
- SEO or marketing managers
Ask them to do three things: break down the content into its most atomic parts, classify it, and add metadata.
Atomic content:
- What are your things? How are they related?
- How do experts describe the things? How do users describe them?
- How detailed can we get and keep the editing process sustainable?
- Should different groups of people have permission to edit different things?
- What devices are people likely to use to consume this content? Can this be content be consumed on that device?
Classifying content:
- How are these things grouped? List all the ways.
- Will authors choose from a set of presets, or should they be able to enter anything?
Metadata:
- What are the parts that make up your things?
- Which of those fit the fields WordPress has already provided (excerpts, featured images), and which ones do we need to create?
- What is the format of each part? What should the editing experience be like for this part?
Sometimes putting the model on paper before you talk to these groups can help them understand what you have in mind.
Sketching the content model
On the research group’s site, we found that in addition to the standard pages and posts, we had three distinct things: research projects, publications (the end results of past research projects), and people. These will become our custom post types.
For the research projects, we need to display a few attributes as distinct fields: the start and end dates of the grant, and the amount of money awarded for the research.
For researchers (or people), we’ll use the post title field to store the full name, with appended degrees, as it will be displayed in most situations. However, we do need to alphabetize lists of people, so we need to break out their last names into a separate custom field. Their contact information (phone, email, URL, maybe a Twitter handle) should also go into separate fields so we can pull those into a staff directory. The post body will do just fine for the person’s bio, and and the featured image can store their portrait.
Here’s a diagram of the complete content model (Fig 2-4).
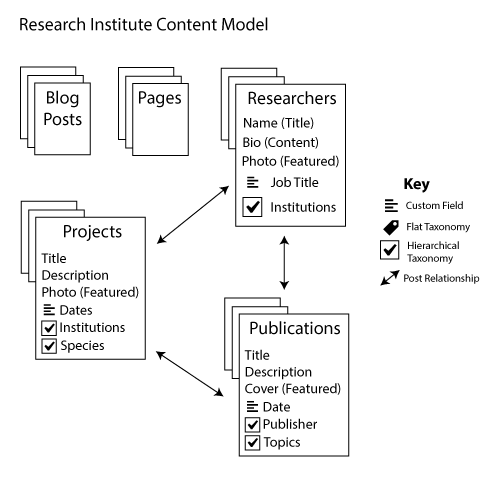
The stacked documents (projects, publications, researchers) are the post types. The custom fields are listed with each post type box. The arrows between the post types represent the connections created using Advanced Custom Fields.
Each hierarchical taxonomy is shown here as a checkbox. Institutions is a taxonomy shared by two of the post types. For projects, it represents the research groups that have sponsored the project. People are listed under each institution for which they work—there might be more than one, in cases of dual academic appointments.
For our example site, we’ll skip the publications, since those are structurally almost identical to projects.
Over the next few chapters, then, we will build:
Custom post types:
projects
people
Custom taxonomies:
institutions (for projects and people)
species (for projects)
Custom field groups [and formats]:
Research project information (for projects)
Start date [date]
End date [date]
Award amount [money]
Name and job title (for people)
Last name
Job title
Contact information (for people)
Phone number [formatted text: seven digits, no area code]
Email address [email]
URL [url]
Both our taxonomies for this site will be flat, with an auto-suggest input field.
In Chapter 3, I’ll show you how to build this site, with or without code.
Tip: Use Hierarchy to visualize your site’s structure
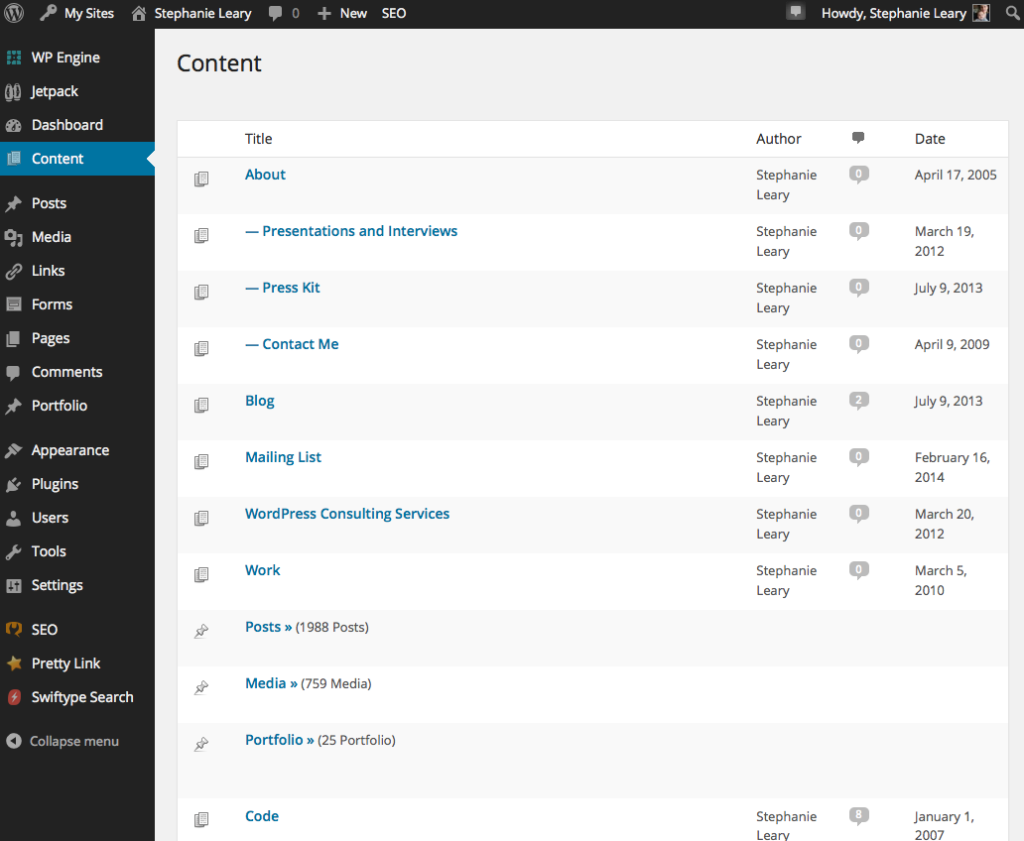
Once you start breaking your content out of pages and posts into custom post types, you might find that your post and page lists don’t reflect your site’s real structure anymore. To help you—and your users—visualize the true hierarchy of your content as you build your new content models, try the Hierarchy plugin (Fig 2-5).
More Content Models
Many content models share a similar structure: people attached to the products of their work, with various custom fields for each post type.
Here are three sample content models, with the basic post type, taxonomy, and field setup required to implement them.
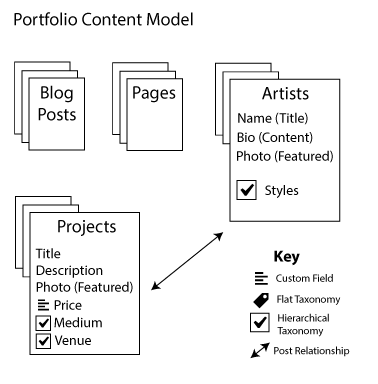
Portfolio (Fig. 2-6)
Post Types: projects, artists (or people)
Taxonomies: medium, venue (projects); styles (artists)
Custom fields: price (projects)
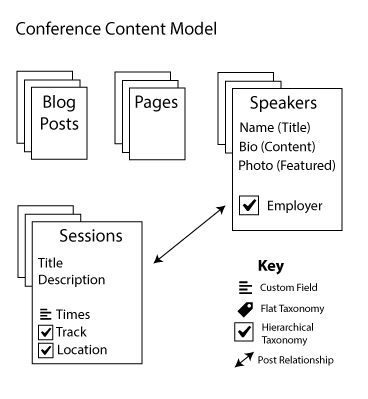
Conference (Fig. 2-7)
Post Types: sessions, speakers (or people)
Taxonomies: track, location (sessions); employer or organization (speakers)
Custom fields: times (sessions)
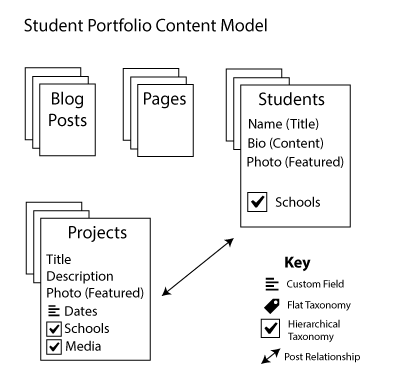
Student Portfolio (Fig. 2-8)
Post Types: projects, students (or people)
Taxonomies: schools (shared, and projects and people); media (projects)
Custom fields: dates (projects)
Content analysis questions
If you’re still not sure about your content model, discuss these questions with your stakeholders:
- Do our existing groupings make sense? Do our editors understand the differences between them? Do we have any groups in which several kinds of tags are mixed? If so, add taxonomies until your groups are clearly delineated and intuitive to your editors.
- Do we need to search, filter, or sort things according to certain criteria? If so, are those criteria separate fields? If not, create new custom fields for them.
- Do we need to apply a specific, consistent style to any text or image that is currently part of the post body? If so, separate that item into its own custom field.
- Now, look again at your groupings. Are you using taxonomies to separate a large number of items that really have a completely different context than items in the other taxonomies? If so, consider creating a new post type for these items instead.
Once you’re reasonably confident in your content model sketch, you can start building the model in WordPress.
To learn how to build your content model, pick up Content Strategy for WordPress from:
Kindle | Nook | iBooks | Kobo | Smashwords
